10 KiB
An OAuth Login Page for Titanium
Almost any app on the store proposes a customized experience by allowing the user to "login". If the login screen is really easy to design with Titanium, implementing the security protocol (OAuth) beneath could be quite challenging.
Hopefully, since Appcelerator is now part of Axway, we can use the Axway API Gateway to implement the OAuth protocol and just use it in Titanium. Here is how to do it...
Required features
Let's say we have an existing application that will receive our new login feature.
We could want to implement:
- User Authentication at app launch or on user action (a "login" button for instance)
- A sole authentication method : login and password
- Never store the user password locally (it is NOT secure !)
- Renew the session when expired
- Keep state between launch (if the user is logged in, he can close the app, re-open it and will still be logged in)
Everything you need to know about OAuth!
OAuth is an open standard for Authentication and Authorization. Due to its simplicity and wide use cases, it is widely used in the Web and Mobile worlds.
OAuth has several "flows". Each flow match a sepecific use case. For our case, we will use the "Ressource Owner Password Credentials" flow (ROPC).
In this flow, you just have to POST to the token endpoint of the Authorization Server (AS):
- your
client_id/client_secret(what identify / authenticate the client application) - the login and password of the enduser
- a scope (think scopes as "entitlements")
This flow is dead easy to implement :
POST /token HTTP/1.1
Host: server.example.com
Authorization: Basic czZCaGRSa3F0MzpnWDFmQmF0M2JW
Content-Type: application/x-www-form-urlencoded

grant_type=password&username=johndoe&password=A3ddj3w&scope=openid
The Authorization header is your client_id / client_secret and the rest of the form is trivial.
If the user and password are correct, the OAuth Authorization Servers issues an access_token and a refresh_token.
HTTP/1.1 200 OK
Content-Type: application/json;charset=UTF-8

{
  "access_token":"2YotnFZFEjr1zCsicMWpAA",
  "token_type":"bearer",
  "expires_in":3600,
  "refresh_token":"tGzv3JOkF0XG5Qx2TlKWIA"
}
Then, you can access a protected API on the Resource Server (RS) by passing back the access_token in the Authorization header.
GET /resource HTTP/1.1
Host: server.example.com
Authorization: Bearer 2YotnFZFEjr1zCsicMWpAA
Eventually, when the access_token expires, the Resource Server replies with a 401. In that case, you can renew the access_token by providing the refresh_token to the token endpoint.
POST /token HTTP/1.1
Host: server.example.com
Authorization: Basic czZCaGRSa3F0MzpnWDFmQmF0M2JW
Content-Type: application/x-www-form-urlencoded

grant_type=refresh_token&refresh_token=tGzv3JOkF0XG5Qx2TlKWIA
If the refresh_token is not expired, you will get a new access_token along with a new refresh_token.
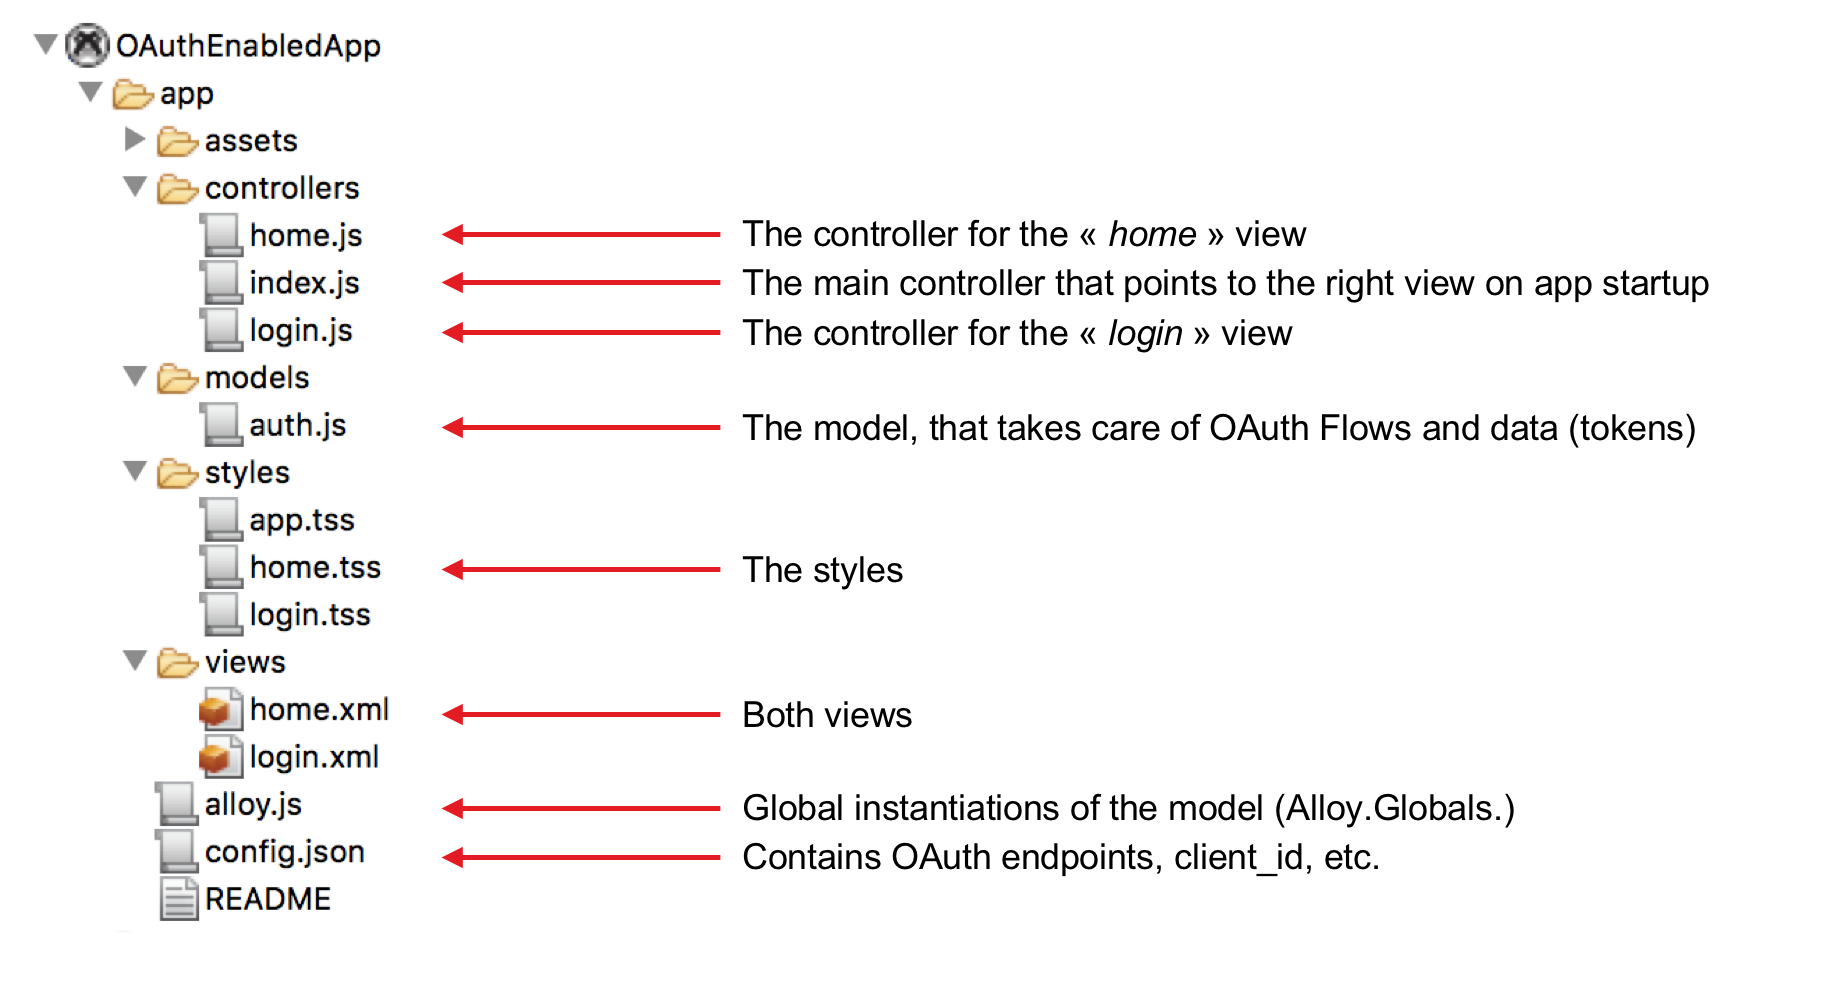
Design
To support our "login" feature, we will have to implement :
- 1 model
- 2 views (one for the login screen, and one sample view upon successful login) with their controller
- 1 controller to points at the right view on startup
Of course, since we will code in Javascript, the communication between model, view and controller will be mainly asynchronous.
User Stories
To help us build a good user experience, let's describe the possible user journeys, or stories.
- first, the user will login in our application
- then, he will close the app and re-open it
- finally, he will logout
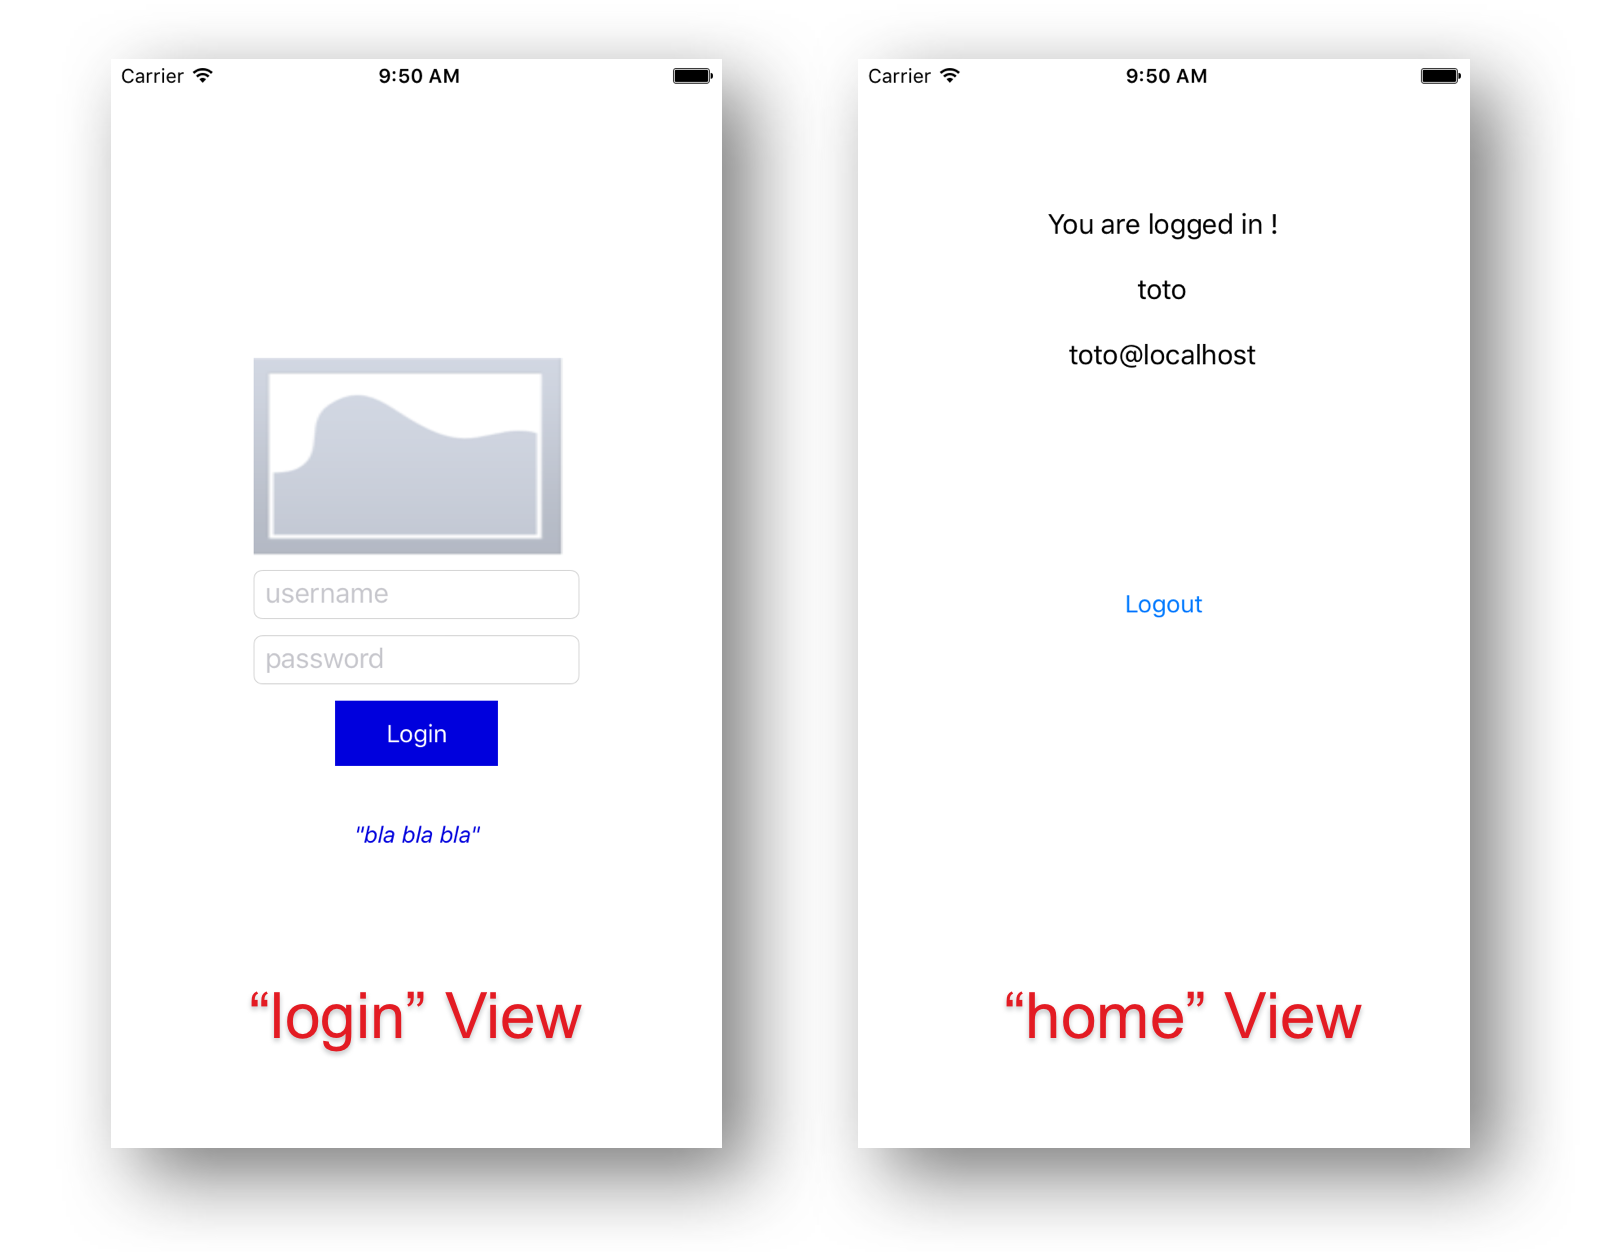
Views
The two views of our applications are :
- The ”login” view is to be customized (logo, styles, content, etc.)
- The ”home” view is to be replaced by a business view of the application
The "auth" Model
The "auth" model has the following API:
login(username, password): go through the OAuth sequence
- Emit the
loginSucceededevent if the OAuth sequence is successful - Emit the
loginFailedevent if the OAuth sequence fails
logout(): destroy locally the OAuth tokens
validateAuth(): validate the session server-side and renew the access_token if required
- Emit the
loggedInevent if the session is valid - Emit the
loginNeededevent if the sessions is not valid anymore (the access_token could not be renewed)
The model is instantiated once on app startup (alloy.js)
Alloy.Models.auth = Alloy.createModel('auth', {id: "user-info"});
It can be accessed anywhere from the app using Alloy.Models.auth.
Pointing to the right view on app startup
This is done in the main controller (index.js) :
Alloy.Models.auth.fetch(); // Fetch the model's data from filesystem

Alloy.Models.auth.on("loggedIn", function (e) {
	// Open the view 'home' if the user has a valid session
	Alloy.createController('home', e).getView().open();
});

Alloy.Models.auth.on("loginNeeded", function (e) {
	// Open the view 'login' if the user has no valid session
	Alloy.createController('login').getView().open();
});

// Trigger the session validation (result will be known by either
// the loginNeeded event or the loggedIn event)
Alloy.Models.auth.validateAuth();
Login sequence
The login sequence is triggered by a call to the “login” method of the model.
function login(e) {
	Alloy.Models.auth.login($.username.value, $.password.value);
}
The outcome is known by events loginSucceeded and loginFailed.
Alloy.Models.auth.on("loginSucceeded", function (e) {
	Alloy.createController('home', e).getView().open();
	$.login.close();
});

Alloy.Models.auth.on("loginFailed", function (e) {
	alert("Login Failed !");
});
Logout Sequence
The “logout” method always works locally and thus always succeeds.
function logout(e) {
	Alloy.Models.auth.logout();
    Alloy.createController('login').getView().open();
	$.home.close();
}
Using the access_token in an XHR
The access_token can be retrieved using the get method of the model as in the following code :
var xhr = Ti.Network.createHTTPClient({
  onload: function onLoad() { alert(this.responseText); },
  onerror: function onError() { alert(this.status + ": " + this.responseText); }
});

xhr.open("GET", "https://my.server/res");
xhr.setRequestHeader("Authorization","Bearer " + Alloy.Models.auth.get("accessToken"));
xhr.send();
Renewing access_token upon expiration during an XHR
When the access_token expires, the server returns an HTTP 401 status.
It has to be handled by calling the validateAuth method of the model.
- Upon
loggedInevent, get the new access token (‘get’ method on the model) and re-run the XHR - Upon
loginNeededevent, redirect the user to the login page (refresh_token expired)
The following sample code handles the renewal scenario :
function firexhr(method, url, body, onload, onerror, stop) {
	var xhr = Ti.Network.createHTTPClient({
		onload: onload,
		onerror: function () {
			Ti.API.info("xhr: http status: " + this.status);
			if (this.status == 401 && !stop) {
				var callbackOK = function (e) {
					// Unsubscribe from both events as soon as possible
					Alloy.Models.auth.off("loggedIn", callbackOK);
					Alloy.Models.auth.off("loginNeeded", callbackKO);

					try {
						Ti.API.info("xhr: callback running !");
						firexhr(method, url, body, onload, onerror, true);
					} catch (e) {
						Ti.API.info("xhr: callback error: " + e.message);
					}
				};
				var callbackKO = function (e) {
					// Unsubscribe from both events as soon as possible
					Alloy.Models.auth.off("loggedIn", callbackOK);
					Alloy.Models.auth.off("loginNeeded", callbackKO);

					alert("Your session has expired ! Please login again. ");
					Alloy.Models.auth.logout();
					Alloy.createController('login').getView().open();
					$.home.close();
				};
				Alloy.Models.auth.on("loggedIn", callbackOK);
				Alloy.Models.auth.on("loginNeeded", callbackKO);
				Alloy.Models.auth.validateAuth();
			} else {
				onerror();
			}
		},
	});

	xhr.open(method, url);
	xhr.setRequestHeader("Authorization","Bearer " + Alloy.Models.auth.get("accessToken"));
	xhr.send();
}
You can test it like this :
firexhr("GET", Alloy.CFG.oauth_userinfo_endpoint, null,
		function () { alert(this.responseText); },
		function () { alert(this.status + ": " + this.responseText); });
Get the user identity from the ‘home’ view
It could be useful in our app if we could display the user identity once the user logged in. Wouldn't it be nice if we could say "Welcome John" once logged in ?
This can be done in two different ways :
- Call
Alloy.Models.auth.get("...")fromhome.js - Retrieve the arguments passed to
homefromindex
In index.js (e is the user identity received from the model, to pass to the home view) :
Alloy.createController('home', e).getView().open();
In home.js :
var e = arguments[0] || {};
$.username.setText(e.login);
$.email.setText(e.email);
Configuration
Do not forget to edit your config.json to point your API Gateway intance and register your client_id / client_secret.
{
	"global": {},
	"env:development": {
		"oauth_token_endpoint": "https://apigw:8089/api/oauth/token",
		"oauth_userinfo_endpoint": "https://apigw:8089/api/openid/user_info",
		"oauth_client_id": "32ed2670-3846-47a9-90e0-a4a9260f000f",
		"oauth_client_secret": "8b5819b5-a274-42f2-a090-c7f796bcd6c6",
		"oauth_scope": "openid"
	},
	"env:test": {},
	"env:production": {},
	"os:android": {},
	"os:blackberry": {},
	"os:ios": {},
	"os:mobileweb": {},
	"os:windows": {},
	"dependencies": {}
}
The GitHub Project
The sample app is available for download on GitHub so that you start playing with it.
You can download the app template here.
Code Strong!